大家好,我是方木
微信搜索 Java架构师进阶编程 关注公众号,Java干货及时送达
前言
本次打算直接上干货分享 RabbitMQ Java 客户端一系列的源码分析 (com.rabbitmq:amqp-client:4.8.3)
❝
ps: 最近接收到公司的任务就是阅读和分析 spring-rabbit、amqp-client,因此打算一同和大家分享 amqp-client。由于 RabbitMQ 是 Erlang 语言开发(暂时没有对这块分享的计划)
友情提醒:本次分享适合的人群,需要对 RabbitMQ 有一定的了解
❞RabbitMQ Getstarted: https://www.rabbitmq.com/#getstartedJava Client API Guide: https://www.rabbitmq.com/api-guide.html废话不多话,开整!!!
Java Client Connection Demo
我们先看一个官网提供的 Java Client Connecting to RabbitMQ Demo
ConnectionFactoryfactory=newConnectionFactory(); //”guest”/”guest”bydefault,limitedtolocalhostconnections factory.setUsername(userName); factory.setPassword(password); factory.setVirtualHost(virtualHost); factory.setHost(hostName); factory.setPort(portNumber); Connectionconn=factory.newConnection(); Channelchannel=connection.createChannel(); byte[]messageBodyBytes=”Hello,world!”.getBytes(); channel.basicPublish(EXCHANGE_NAME,routingKey,MessageProperties.PERSISTENT_TEXT_PLAIN,messageBodyBytes); channel.close(); connection.close();
AMQP 协议交互流程
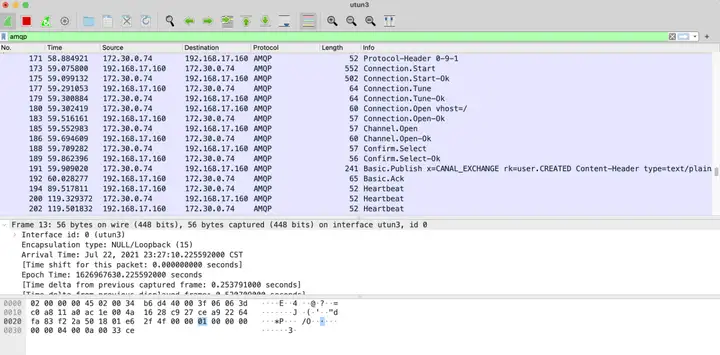
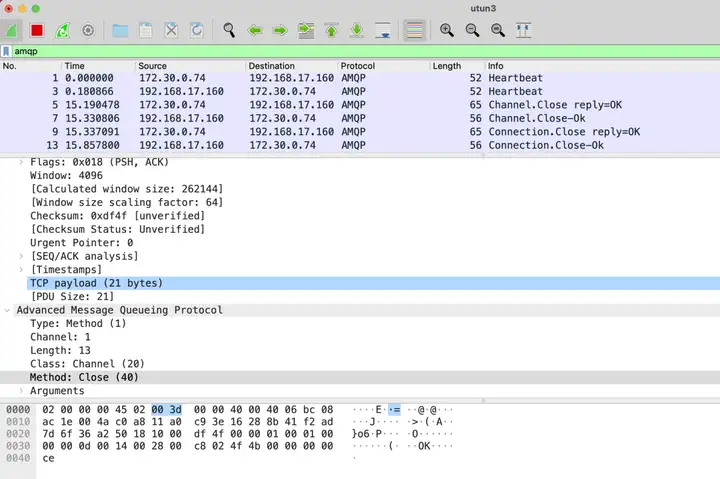
已经使用过 RabbitMQ 的同学相信已经不陌生,因此就简单的描述下:与 RabbitMQ Broker 建立 Connection 和 Channel,发送消息后,关闭 Connection 和 Channel 的过程。下图是 针对这个过程使用 Wireshark 抓包查看整个 AMQP 协议的交互流程(172.30.0.74 为客户端即本机 ip;192.168.17.160 为 RabbitMQ Broker 的 ip)
「client 与 broker 创建Connection、Channel、发送消息」

「client 与 broker 发送心跳(Heartbeat)、关闭Connection、Channel」

为了让读者更容易看得源码,我先给大家描述下 client 与 broker 之间 AMQP 协议的交互流程描述(AMQP 协议中 不少命令都是成对存在的,抓包协议中 Info 里的命令是 -,而代码里的是 驼峰式 此处以代码为准):
将 AMQP 0-9-1 的连接头写入底层套接字,包含指定的版本信息(客户端告诉 broker 自己使用的协议及版本,底层使用 java 自带的 socket)客户端等待 broker 发送的 Connection.Start (broker 告诉客户端 通信的协议和版本、SASL认证机制(详细见)、语言环境以及RabbitMQ的版本信息和支持能力)客户端接收后 发送 Connection.StartOk (客户端告诉 broker 连接使用的帐号和密码、认证机制、语言环境、客户的信息以及能力)客户端等待 broker 发送的 Connection.Tune (broker 与 客户端 进行参数协商)客户端接收后 发送 Connection.TuneOk (客户端 参数 [ChannelMax、FrameMax、Heartbeat] 协商完成后告诉 broker)客户端发送 Connection.Open (客户端 告诉 broker 打开一个连接,并请求设置_virtualHost [vhost])broker 接收到后返回 Connection.OpenOk (client 对 vhost 进行验证,成功则返回如下此信息)客户端发送 Channel.Open,broker 接收到后返回 Channel.OpenOk (客户端 创建通道;broker 收到并创建通道完成)客户端发送 Confirm.Select,broker 接收到后返回 Confirm.SelectOk(客户端告诉 broker 消息需要使用 confirm的机制,broker收到并回复)客户端发送消息 Basic.Publish,broker 应答返回 Basic.Ack期间 客户端和 broker 会相互检查彼此的心跳 heartbeat客户端 关闭通道 Channel.Close,broker 应答返回 Channel.CloseOk客户端 关闭连接 Connection.Close,broker 应答返回 Connection.CloseOk源码分析
熟悉完AMQP 协议的交互流程易于后续理解源码,开始本次主要介绍 Connection 相关的源码:ConnectionFactory.newConnection –> AMQConnection.start
「ConnectionFactory.newConnection()」
publicConnectionnewConnection(ExecutorServiceexecutor,AddressResolveraddressResolver,StringclientProvidedName) throwsIOException,TimeoutException{ if(this.metricsCollector==null){ this.metricsCollector=newNoOpMetricsCollector(); } //makesurewerespecttheprovidedthreadfactory //创建socketFactory和初始化相应的配置 FrameHandlerFactoryfhFactory=createFrameHandlerFactory(); //初始化Connection涉及到的参数 ConnectionParamsparams=params(executor); //setclient-providedviaaclientproperty if(clientProvidedName!=null){ Map<String,Object>properties=newHashMap<String,Object>(params.getClientProperties()); properties.put(“connection_name”,clientProvidedName); params.setClientProperties(properties); } //这块逻辑属于rabbit提供自动回复连接的逻辑 if(isAutomaticRecoveryEnabled()){ //seecom.rabbitmq.client.impl.recovery.RecoveryAwareAMQConnectionFactory#newConnection AutorecoveringConnectionconn=newAutorecoveringConnection(params,fhFactory,addressResolver,metricsCollector); conn.init(); returnconn; }else{ List<Address>addrs=addressResolver.getAddresses(); ExceptionlastException=null; for(Addressaddr:addrs){ try{ //创建、连接socket并封装成返回SocketFrameHandler(socket不采用Negale算法[Negale算法,大家有兴趣可以了解下这块针对socket缓存性能的优化]) FrameHandlerhandler=fhFactory.create(addr); //初始化配置、_channel0、_channelManager等等 AMQConnectionconn=createConnection(params,handler,metricsCollector); //启动AMQConnection后续会进行详细介绍 conn.start(); this.metricsCollector.newConnection(conn); returnconn; }catch(IOExceptione){ lastException=e; }catch(TimeoutExceptionte){ lastException=te; } } if(lastException!=null){ if(lastExceptioninstanceofIOException){ throw(IOException)lastException; }elseif(lastExceptioninstanceofTimeoutException){ throw(TimeoutException)lastException; } } thrownewIOException(“failedtoconnect”); } }
AMQP 协议的交互流程中 1~6 的逻辑属于 AMQConnection.start() 的重点逻辑,也是本次给大家主要介绍的点
publicvoidstart() throwsIOException,TimeoutException{ //初始化工作线程 initializeConsumerWorkService(); //初始化心跳发送 initializeHeartbeatSender(); //将Connection标志位启动 this._running=true; //确认客户端第一件事发送header头部协议 AMQChannel.SimpleBlockingRpcContinuationconnStartBlocker= newAMQChannel.SimpleBlockingRpcContinuation(); //进入Rpc队列进行阻塞,等待broker返回connection.startmethod _channel0.enqueueRpc(connStartBlocker); try{ //ThefollowingtwolinesareakintoAMQChannels //transmit()methodforthispseudo-RPC. _frameHandler.setTimeout(handshakeTimeout); //1.发送header头部协议AMQP0-9-1 _frameHandler.sendHeader(); }catch(IOExceptionioe){ _frameHandler.close(); throwioe; } //初始化启动startMainLoop–为了接收和处理broker发送的消息 this._frameHandler.initialize(this); AMQP.Connection.StartconnStart; AMQP.Connection.TuneconnTune=null; try{ //2.客户端等待broker发送的Connection.Start connStart= (AMQP.Connection.Start)connStartBlocker.getReply(handshakeTimeout/2).getMethod(); //通信的协议和版本、SASL认证机制(详细见)、语言环境以及RabbitMQ的版本信息和支持能力 _serverProperties=Collections.unmodifiableMap(connStart.getServerProperties()); VersionserverVersion= newVersion(connStart.getVersionMajor(), connStart.getVersionMinor()); //版本比对 if(!Version.checkVersion(clientVersion,serverVersion)){ thrownewProtocolVersionMismatchException(clientVersion, serverVersion); } String[]mechanisms=connStart.getMechanisms().toString().split(“”); SaslMechanismsm=this.saslConfig.getSaslMechanism(mechanisms); if(sm==null){ thrownewIOException(“Nocompatibleauthenticationmechanismfound-“+ “serveroffered[“+connStart.getMechanisms()+”]”); } Stringusername=credentialsProvider.getUsername(); Stringpassword=credentialsProvider.getPassword(); LongStringchallenge=null; LongStringresponse=sm.handleChallenge(null,username,password); do{ //3.客户端接收后发送`Connection.StartOk` Methodmethod=(challenge==null) ?newAMQP.Connection.StartOk.Builder() .clientProperties(_clientProperties) .mechanism(sm.getName()) .response(response) .build() :newAMQP.Connection.SecureOk.Builder().response(response).build(); try{ MethodserverResponse=_channel0.rpc(method,handshakeTimeout/2).getMethod(); if(serverResponseinstanceofAMQP.Connection.Tune){ //4.客户端等待broker发送的Connection.Tune connTune=(AMQP.Connection.Tune)serverResponse; }else{ challenge=((AMQP.Connection.Secure)serverResponse).getChallenge(); response=sm.handleChallenge(challenge,username,password); } }catch(ShutdownSignalExceptione){ MethodshutdownMethod=e.getReason(); if(shutdownMethodinstanceofAMQP.Connection.Close){ AMQP.Connection.CloseshutdownClose=(AMQP.Connection.Close)shutdownMethod; if(shutdownClose.getReplyCode()==AMQP.ACCESS_REFUSED){ thrownewAuthenticationFailureException(shutdownClose.getReplyText()); } } thrownewPossibleAuthenticationFailureException(e); } }while(connTune==null); }catch(TimeoutExceptionte){ _frameHandler.close(); throwte; }catch(ShutdownSignalExceptionsse){ _frameHandler.close(); throwAMQChannel.wrap(sse); }catch(IOExceptionioe){ _frameHandler.close(); throwioe; } try{ //最大通道数 intchannelMax= negotiateChannelMax(this.requestedChannelMax, connTune.getChannelMax()); _channelManager=instantiateChannelManager(channelMax,threadFactory); //帧最大的大小 intframeMax= negotiatedMaxValue(this.requestedFrameMax, connTune.getFrameMax()); this._frameMax=frameMax; //心跳 intheartbeat= negotiatedMaxValue(this.requestedHeartbeat, connTune.getHeartbeat()); setHeartbeat(heartbeat); //5.客户端接收后发送Connection.TuneOk _channel0.transmit(newAMQP.Connection.TuneOk.Builder() .channelMax(channelMax) .frameMax(frameMax) .heartbeat(heartbeat) .build()); //6.客户端发送Channel.Open _channel0.exnWrappingRpc(newAMQP.Connection.Open.Builder() .virtualHost(_virtualHost) .build()); }catch(IOExceptionioe){ _heartbeatSender.shutdown(); _frameHandler.close(); throwioe; }catch(ShutdownSignalExceptionsse){ _heartbeatSender.shutdown(); _frameHandler.close(); throwAMQChannel.wrap(sse); } //Wecannowrespondtoerrorshavingfinishedtailoringtheconnection this._inConnectionNegotiation=false; }
最后
本次分享的目的,先让读者对于 RabbitMQ Client 与 RabbitMQ Broker 根据 AMQP 协议交互流程有个大体的认识,并根据分析 Connection 源码有一定认知,其中还有很多 Connection 细节源码需要读者慢慢体会。
END

点分享

点收藏

点点赞

点在看


